Opal-6 Application Development - C/C++
This page covers development of a minimal application - Hello World, no less!
We take you through setup, building, deployment and debugging this app on Opal-6.
This is a simple C/C++ application, developed on a Linux PC. There are many other ways to develop applications for Linux, but this is a good starting point.
Setting up the Toolchain
A toolchain is needed to build custom applications for Opal-6. You can use:
- A pre-built toolchain for our XFCE demo image, or
- Build one yourself using the YOCTO tools we provide.
Using the Demo Toolchain
The download link for this is on the releases page.
Building Your Own Toolchain
Please this page for instructions on how to build your own toolchain.
Installing the Toolchain
To install the toolchain, do the following:
$ cd ~/fsl-community-bsp/build/tmp/deploy/sdk$ ./poky-glibc-x86_64-meta-toolchain-cortexa9hf-vfp-neon-toolchain-2.0.1.sh
The actual installer name may be different to that used above. Just follow the prompts to complete the installation. In most cases you can simply accept the defaults.
IDE Setup
We use the CodeBlocks IDE for development and this section details how to set it up.
First, download and install CodeBlocks. Use the Ubuntu Software Centre, or the following command line:
$ sudo apt-get install codeblocks codeblocks-contrib
To configure CodeBlocks for our toolchain:
We need to configure CodeBlocks to use our toolchain and sysroot so do the following:
- Start CodeBlocks
- Open Settings->Compiler
- Choose ‘GNU GCC for ARM’ from ‘Selected Compiler’ and click ‘Copy’
- Give your new compiler a name e.g. YOCTO compiler for Opal-6
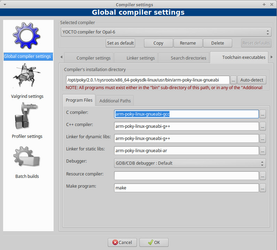
- Now click the ‘Toolchain executables’ tab and browse to your sdk installation directory. You are looking for the parent to the compilers bin directory which in our case is: /opt/poky/2.0.1/sysroots/x86_64-pokysdk-linux/usr/bin/arm-poky-linux-gnueabi
- Now fill in the Program Files by prepending ‘arm-poky-linux-gnueabi-’ to each of gcc, g++ and ar. You should end up with the following:
Next we need to configure the compiler and linker:
- Click Compiler Settings, then Other Options
- Paste the following into the text window:
-march=armv7-a -marm -mthumb-interwork -mfloat-abi=hard -mfpu=neon -mtune=cortex-a9--sysroot=/opt/poky/2.0.1/sysroots/cortexa9hf-vfp-neon-poky-linux-gnueabi - Click Linker Settings and copy the same text into the Other Linker Options window
- Click OK
Debugger Setup
Debugging applications on Opal-6 requires two components:
- gdbserver running on Opal-6
- gdb client running on the VM
The Opal-6 images include the gdbserver components, so we just need to configure CodeBlocks to connect via the gdb client:
- Start CodeBlocks
- Open Settings->Debugger
- Click the 'GDB/CDG debugger' option from the left side menu
- Click 'Create Config' button and enter a name for this debugger. e.g. "Opal-6" and press ENTER.
- Click "Opal-6" on the left hand menu and paste the path of your Opal-6 toolchain debugger into the Executable Path text box:
e.g. /opt/poky/2.0.1/sysroots/x86_64-pokysdk-linux/usr/bin/arm-poky-linux-gnueabi/arm-poky-linux-gnueabi-gdb
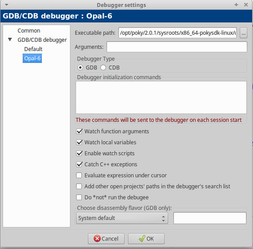
6. You setup should look like the above image. Click OK to finish.
To set this debugger as the default for Opal-6, do the following:
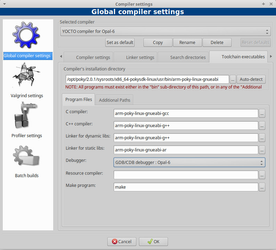
- Open Settings→Compiler
- Click the Toolchain Executables tab.
- Select the Opal-6 compiler from the menu
- Change Debugger to Opal-6 from the menu and click OK.
Before you continue - save everything by using File→Save Everything item in the menu.
Creating a Linux Application
These steps will show how to create and compile a simple project for Opal-6.
First we will create the project and configure it to use the Opal-6 tools:
- Start CodeBlocks
- Select File->New->Project from the menu, then select Empty Project. Press Go.

- Use the wizard and set the title as Hello World and choose a project folder.
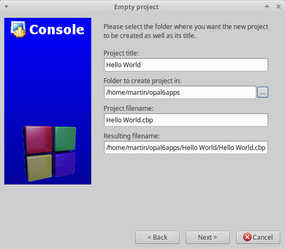
- Click Next and set the compiler to YOCTO Compiler for Opal-6. Debug and Release configurations will be created.
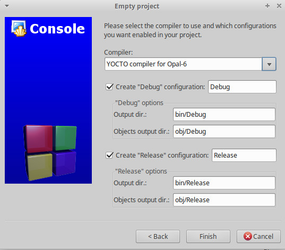
- Click Finish.
Now we need to add a file:
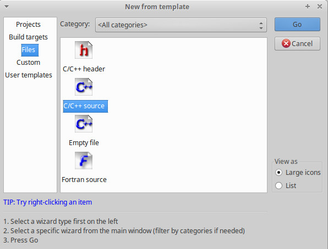
- Select File->New->File and select C/C++ Source. Press Go.
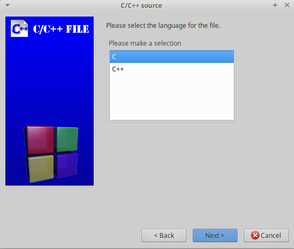
- Use the wizard and seslect the language for the file - in this case we want to use C. Press Next.
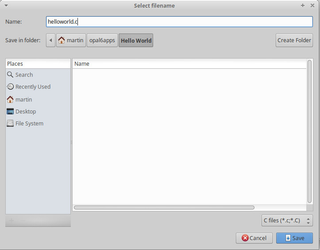
- Press '...' and enter the file name helloworld.c, and then Save, followed by Finish.
- Paste the following code into the editor:
#include <stdio.h>

int main(int argc, char **argv)
{
    printf("Hello World!\n");
    return 0;
}
5. Select Build→Build from the menu to compile the project.
Deploying the Application
You can deploy your application manually to Opal-6, or configure CodeBlocks to automatically deploy when you build.
These steps require Opal-6 to be connected to the same network as your development PC. You also need to know the IP address of the Opal-6. You can determine this by entering
$ ifconfig
in a terminal window on Opal-6.
You will see details for eth0 (the ethernet port0 and lo. The eth0 portion will look something like this:
eth0 Link encap:Ethernet HWaddr AE:87:1E:2C:A0:74
 inet addr:192.168.1.137 Bcast:192.168.1.255 Mask:255.255.255.0
 inet6 addr: fe80::ac87:1eff:fe2c:a074/64 Scope:Link
 UP BROADCAST RUNNING MULTICAST MTU:1500 Metric:1
 RX packets:37 errors:0 dropped:0 overruns:0 frame:0
 TX packets:33 errors:0 dropped:0 overruns:0 carrier:0
 collisions:0 txqueuelen:1000
 RX bytes:6754 (6.5 KiB) TX bytes:6446 (6.2 KiB)
On the second line you will see the inet addr. Use the IP address shown here. In the case above it is 192.168.1.137.
Manual Deployment
You can manually deploy applications to Opal-6 using scp.
To deploy your Hello World application, open a terminal on your PC and type the following commands:
$ cd opal6apps/Hello World
$ scp bin/Debug/hello world root@<opal-6 IP address>:~/
Your Opal-6 needs to be connected to your network. Change the IP address in the line above to match the address of your board.
Execute the following in an Opal-6 terminal window to run the application:
$ ./helloworld
Deployment using CodeBlocks
To setup CodeBlocks to automatically deploy when it builds:
- Right-click on the project in the Management pane on the left and select Build options...
- Click on the Pre/post build steps tab
Paste the following into the post build steps window (with the correct IP address for your board).
scp $(TARGET_OUTPUT_FILE) root@<opal-6 IP address>:~/
- Repeat the step above for each target build type (debug, release etc)
- Click OK
Now, whenever you successfully compile your project, it will be copied to Opal-6.
Debugging
It's pretty hard to make a mistake in "Hello World", but let's take a look at how the debugger works.
First, check that your build target is set to Debug, so all the debug symbols are included.
Next, start gdbserver on Opal-6 but typing the following in an Opal-6 terminal window:
$ gdbserver localhost:12345 helloworld
You can set the port to whatever you like but make sure you aren't using a port already in use, it is best to use numbers above 10000.
This command will cause gdbserver to wait for a remote connection.
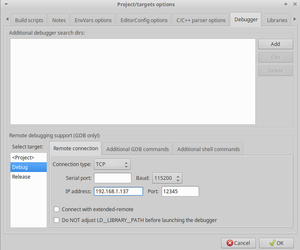
Now we need to configure CodeBlocks with the IP address and Port for Opal-6.
- Right-click the project in the left-hand pane and select Properties
- Click the right arrow at the top of the tabs until you see Debugger, and select that
- Under Select Target, choose Debug, then enter the IP address and Port for Opal-6. Click OK.
In CodeBlocks you can start debugging your application.
- Click on the printf line in the source code and press F5 to toggle a breakpoint.
- Start the debugging session by clicking Start/Continue from the Debug toolbar or the Debug menu. Note that the Debug menu shows shortcut keys.
- The code will be executed on Opal-6 and break on the line specified.
When you close your application, gdbserver will automatically close. You must start it again before debugging again.