Introduction
In this document we shall provide a basic overview of how to develop C# .NET applications for the Opal-6 range of boards on a Windows host machine. The following areas will be covered:
Configuring the development environment
Writing a demo application
Deploying to Opal6
Debugging
Prerequisites
You will need to download and install the following applications:
Xamarin Studio for Windows. This is called MonoDevelop on Linux and to alleviate any incompatibility issues, please download the Windows version from:
- http://www.npackd.org/p/monodevelop/5.10.1.6
At the time of writing the latest version of Xamarin Studio was incompatible with the pdb2mdb tool required later on so do not allow the IDE to upgrade
We will need the Putty SSH tools for automating some remote tasks such as copying files and running the remote debugger
Installing and Configuring the Tools
Run the installer to install Xamarin. Once this is done you need to configure the environment to support remote debugging so you can debug applications running on your Opal6 board. This is simply a matter of setting the variable MONODEVELOP_SDB_TEST to 1.
Right click on the Start Menu and select 'System'
Click on 'Advanced System Settings' and then 'Environment Variables'
Click 'New' and add MONODEVELOP_SDB_TEST and set value to 1
Now unzip the Putty package and copy it to your C:\Program Files folder. Next add Putty to the PATH environment variable:
Right click on the Start Menu and select 'System'
Click on 'Advanced System Settings' and then 'Environment Variables'
Click on 'Path' and press 'Edit...'
Click 'New' and add the path to your Putty installation e.g. 'C:\Program Files (x86)\Putty'
You will need to run putty manually to set up the ssh key for the connection to your Opal6 board. Run 'cmd' from the Start menu and type:
putty.exe -ssh root@your_ip
then follow the instructions to save the key.
Your First Linux C# Application
So now Xamarin Studio is installed lets use it to build a traditional HelloWorld application:
First create a new solution from the File menu or from the left hand shortcut pane
Choose Console Project using C#
Name your project 'HelloWorld' and select a Project folder if you prefer to change the default location
Click 'Create' and the project framework will be generated which will form our Hello World example as is
Deploying and Debugging Your Application
You have two choices when it comes to debugging your application:
- Debug the application locally on your development machine
- Remote debug your application on your Opal6 board
Using method 1 is fine if your application is generic enough and doesn't use Opal6 specific hardware or drivers however in most cases you will want to run your application directly on the Opal6 hardware. Debugging locally is simply a matter of running the application from the 'Run' menu or by pressing the 'Run' button on the toolbar. Debugging remotely requires some setup which is explained in the following sectio
Note that the configuration below only needs done once per project
PDB to MDB Conversion
Before you can debug applications on Linux, you will need to convert the standard Windows debugging file format to a Mono compatible one. Specifically we are going to convert the .pdb file into a .mdb one.
First we need to download the conversion utility:
Right click on 'Packages' in in the Solution Explorer and select 'Add Packages'
Search for 'pdb2mdb' and select the 'Mono pdb2mdb' package
Click 'Add Package'
Now lets configure Xamarin to run this tool after each build:
Right click on your project from the solution explorer and select Options
Select 'Build->Custom Commands'
Choose 'After Build' from from the 'Project Operation' pull down menu and enter the following command:
..\packages\Mono.pdb2mdb.0.1.0.20130128\tools\pdb2mdb.exe "${TargetFile}"
Click 'Ok' OK and rebuild your project and the .mdb file should be generated within the target build directory
Configure the Remote Debugger
Remotely debugging your application on your Opal6 board involves the following:
Copy files to the target
Start the remote debugger
Connect to it with Xamarin Studio
You could copy over your files manually with Putty or WinSCP (http://winscp.net/eng/index.php) then manually run the remote debugger each time you want to use it but that soon becomes cumbersome so we will describe the method we use which will automate this process.
Right click on the project from the solution explorer
Click 'Custom Commands' under 'Run'
Select 'Before Execute' from the 'Select a project operation' menu
Add the following command:
pscp -scp "${TargetDir}\*" root@192.168.1.69:~/Replace the IP address with that of your opal6 board
Now add a new 'Before Execute' command:
plink -ssh root@192.168.1.69 "export DISPLAY=:0; mono --debug --debugger-agent=transport=dt_socket,address=0.0.0.0:12345,server=y ${TargetName} > /dev/ttymxc3 &"Replace the IP with that of your Opal6 board and replace 12345 with the port you wish to use
You should end up with the following:
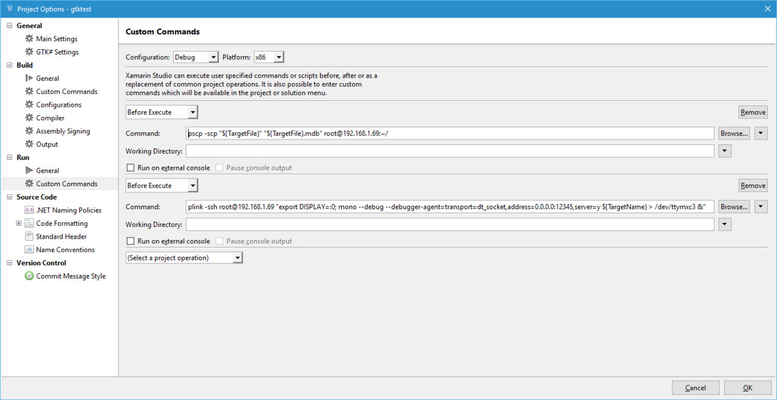
Click 'Ok' to finish.
These commands use Putty SSH client to send over the files then run a remote command to start the debugger on Opal6. The 'export DISPLAY=:0' allows GUI based apps to be run remotely and can be omitted if you are not running a GUI based app. Console based apps have their output redirected to the debug terminal with "> /dev/ttymxc3" so you can watch the output from your application as it occurs.
Running the Debugger
Now that everything is configured you can start your debugging session.
Place a breakpoint at the start of your application by clicking the left column beside the line you want to stop at
Click on 'Run With...' from the 'Run' menu
Click 'Custom Command Mono Soft Debugger'
Fill in your IP and Port then click 'Connect'
You are now debugging your application and can use the debug icons in the toolbar to step through your code
| Panel | ||
|---|---|---|
| ||
|